This is Part 2 in our series on Quick Styles in Microsoft Word*. In Part 1, we covered what quick styles are, why you should use them, and how to apply them to your document. If you missed Part 1, you can read it here.
So now that you know what styles can do, it’s time to make your own!
Create your own style set
You can use these steps to create a customized style from scratch or to save one that you have made modifications to. Open a simple document that has plenty of text.
Let’s start by opening the “Styles” pane. Under the “Change Styles” button on the Home ribbon, click the arrow box ![]() . In the pane that opens, you will see the styles available in the current template. A blue-outlined box will appear around the style of the text that is selected in your current document. So if your cursor in your current document is on the “Heading 1” style, it will be outlined in blue.
. In the pane that opens, you will see the styles available in the current template. A blue-outlined box will appear around the style of the text that is selected in your current document. So if your cursor in your current document is on the “Heading 1” style, it will be outlined in blue.
The simplest way to create a new style set is to start from scratch. You will want to set the individual styles in your document first and then save them to one style set.
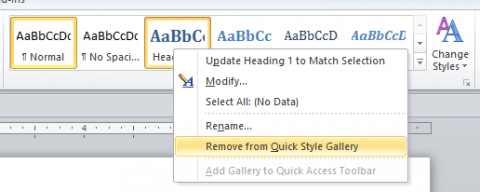
First, clear out the styles appearing in the Quick Styles Gallery.
These will be displaying the styles that your current document is based on. Remove each style by placing your cursor over the style. Right click for a dropdown menu. From this menu, you can select “Remove from Quick Style Gallery.”

Do this for all the styles appearing in the Gallery. When it is empty, you will see “No styles.”
Note: Any style placed in this box (Quick Styles Gallery) will be added to the new style set that you create. It is easiest to clear this out and place your own new styles in it.
Next, add the individual styles in your document.
Begin at the top with your title (or any first style). Remember that any formatting your text is currently in will be saved as a style (so if you don’t want something in bold, be sure to un-bold it!)
- Highlight the text. Move to the “Styles” pane that you opened earlier and go to the very bottom. Click on the “New Style” button.

- Rename this to whatever you’d like, but make sure it is something identifiable like “Basic Title” or “Basic Heading 1.”
- Check the box at the bottom that says “Add to Quick Style list.”
- Click “Save.”
Go through each style in your document with these steps, naming each one according to its level. Your new styles will now be in the Quick Style Gallery. If you need to change any of these, right click on the style (in the Quick Style Gallery) and choose “Modify.”
This is the most important part—save your set!
Go to “Change Styles,” “Style Set,” and scroll to the bottom to select “Save as Quick Style Set.” Name your new style set. This will be available to you whenever you open Word. To access it in any document, go to “Change Styles” and choose it from the list in “Style Set.” It will appear among the standard Word quick styles. When you select it, all the styles you set in the Quick Styles Gallery will appear and you can set up a new document with these.
Keep readability in mind
Be aware that with all the color, formatting, and style options, you may be tempted to get super creative. It is important to remember that the goal of formatting is to increase readability. If your page has eight different heading styles and five shades of pink, your readers will be too distracted by the design to fully comprehend or even read your document. If you are unsure, opt for simplicity or use one of the built-in Microsoft Quick Styles, which work great!
*These instructions are for the PC version of Microsoft Word 2010.